Automated 2D Takeoff in BIM using Revit
This article is a short step by step guide, to automate one of the most common processes in the AEC industry, this process is the 2D Takeoff.
So what is 2D Takeoff? Glad you asked!
2D Takeoff is a byproduct of quantity takeoff when done manually. It's a process most commonly done by estimators. By itself 2D takeoff doesn't do much, but it plays a strong role in validating your quantities and assuring your clients that you went through the project inch by inch during your quantity takeoff phase. Traditionally done with On Screen Takeoff (OST), Bluebeam...
1. What you will Learn:
This article should be easy to follow and reproduce even if you don't have strong technical background. We will learn the following subjects:
- Revit Data Structure (to understand how to collect the data)
- Revit C# SDK (to be able to access Revit data)
- .Net System.
- Basic Bitmap manipulation (to overlay text over images, resize and offset pixels)
The way we will approach this problem is by first building a general data structure that will help us collect data in an organized fashion which in turn should facilitate our 2D rendering/overlay phase.
2.Pitfalls:
There is few concerns and pitfalls that you should be aware of, like:
- We should not rely on Revit sheets when we collect the data, because some parts of the project might not be included in the available sheets!
- We should make sure that we make our changes in the temporary view, to keep original data intact.
Off to work!
3. General Structure
In order to collect our data from Revit in a meaningful and easy way, we will adopt the following data structure which will map key concepts from Revit to our Application.
Project (collections of elements under multiple categories) ---subproject (collection of elements under same category) -----group (collection of elements under same family type) -------components ( collection of elements under same family name and type) -------components -----group -------components -------components ---subprojectOnce we have the structure in mind we can start by collection all the elements in our Revit document:-----group -------components -------components -----group -------components
-------components
---subproject
-----group -------components -------components -----group -----group
 /// <summary>
 /// retreive all elements from document
 /// </summary>
 ///
 public static List<Element> GetAllModelElements(Document doc)
 { List<Element> elements = new List<Element>();

 FilteredElementCollector collector = new FilteredElementCollector(doc).WhereElementIsNotElementType();
 foreach (Element e in collector)
 {
 if (e.IsValidType(e.GetTypeId()) && e.IsValidObject && e.Category != null)
 {if (null != e.get_Geometry(opt) && e.Category.CategoryType != CategoryType.Annotation
 && e.Category.CategoryType != CategoryType.Invalid
 && e.Category.CategoryType != CategoryType.AnalyticalModel) // collecting only valid elements with valid categories
 {
 elements.Add(e);
 }
 }
 }
 return elements;
 }
After we collect all the elements, now we can collect the views, elevations and the sections using following code:
1- getting all original levels


public List GetAllOriginalLevels(Document doc)
{

 List levels = new List();
 FilteredElementCollector collector = new FilteredElementCollector(doc);
 ICollection collection = collector.OfClass(typeof(Level)).ToElements();

 foreach (Element e in collection)
 {
 Level level = e as Level;
 var elementsOnLevel = APIUtilities.GetAllElementsOnLevel(doc, level);


 if (null != level && elementsOnLevel.Count > 0 && IsLevelElevationUnique(levels, level))
 {

 levels.Add(level);
 }
 }

 return levels;
 }


2- getting all original viewPlans


 public List GetAllOriginalViewPlans(Document doc, List originalLevels)

 {
 // The elevation to apply to the new level
 var originalViewPlans = new List();
 FilteredElementCollector collector = new FilteredElementCollector(doc);
 // var name = Regex.Replace(originalLevel.Name, "[^a-zA-Z0-9]+", "");
 var viewplanElems = collector.OfClass(typeof(ViewPlan)).ToElements();
 var levelIds = originalLevels.Select(lvl => lvl.LevelId).ToList();
 foreach (var item in viewplanElems)
 {
 var viewplanElem = item as ViewPlan;
 if (item != null && levelIds.Contains(viewplanElem.LevelId) && !viewplanElem.IsTemplate)
 {
 originalViewPlans.Add(viewplanElem);
 }
 }
 return originalViewPlans;
 }

3- getting all original elevations


public List GetAllOriginalElevations(Document doc, List originalLevels)

 {
 // The elevation to apply to the new level
 var originalElevations = new List();
 FilteredElementCollector collector = new FilteredElementCollector(doc);

 var viewSectionElem = collector.OfClass(typeof(ViewSection)).ToElements();

 int index = 0;
 foreach (var item in viewSectionElem)
 {
 var elevation = item as ViewSection;

 if (!elevation.IsTemplate && elevation != null && IsElevationUnique(originalElevations, elevation))
 {


 originalElevations.Add(elevation);
 }
 index++;

 }
 return originalElevations;
 }
Part 1 was the easy part (data collection phase). now that we have the data (the project elements and the different views and sections), we need to tackle few things:
4-Building our data structure (see concept explained in part 1)
5- Render our plans and elevations in passive mode (technically a greyed out drawing) to use it as our support base.
5.1- Calculating our quantities based on the elements we collected.
5.2- Switch our view to a temporary view and update the state of specific set of our elements (subprojects/groups/components) then render the view in active mode, which will be overlayed on the base we rendered earlier.
5.3-Render the color coding and the quantities descriptions
5.4-Overlay it on top of the previous 2 renders
5.5 - and voila! you have a 2D quantity takeoff plugin, that you can you for any proejct
4. Building our data structure:
We have all the elements collected from part 1, all we need to do now is building a meaningful structure that we can use to store our quantities and color coding.
starting from the lowest level in our data structure, the following code explains how we can generate a full list of components that has every element is our 3d Model. These components are sorted based on their category ( necessary for the next levels).
4.1 Creating components (Level1):
 internal async Task< Dictionary<string, List<Component>>> GenerateComponentsAsync(Document doc, List<Element> totalElems) {    string error = "No suitable component was found for this project (High Category)!";
 var newcomponents = new Dictionary<string, List<Component>>();
   var itemnumber = 1; var totalitems = totalElems.Count; foreach (var element in totalElems) {
 if (element == null) { continue; } else if (element != null && element.IsValidObject) {
 var elemCategory = GetElementCategory(doc, element.Id); var topCategory = GetTopCategory(elemCategory); if (elemCategory != null && (topCategory.SubCategories.Contains(elemCategory.Name) || topCategory == elemCategory)) { if (elemCategory.CategoryType == CategoryType.Model) {  Component component = await CreateComponent(doc, elemCategory, element.Id); Parameter par = doc.GetElement(element.Id).get_Parameter(BuiltInParameter.FAMILY_EXPORT_AS_GEOMETRY); // Element element = docX.GetElement(elemInDoc.Value);
 ElementId typeId = element.GetTypeId(); ElementType type = doc.GetElement(typeId) as ElementType;
 if (component.Name != element.Name) { component.Name = String.Format("{0} {1}", element.Name, component.Name); } if (element.Category != null) { if (par != null) string mainCategory = par.Element.Name;  if (element is FamilyInstance familyinstance) {
 string familyInstance = familyinstance.Symbol.Family.Name; string familyInstanceName = familyinstance.Symbol.FamilyName;
 } if (element.IsValidType(typeId)) {
 if (null != element.GetTypeId()) string subcategoryName = element.GetType().Name;
 Element elemType = doc.GetElement(element.GetTypeId()); if (elemType != null) string elemntType = elemType.Name;
 } if (!string.IsNullOrEmpty(element.Category.Name)) {
 component.CategoryName = element.Category.Name; if (allElements.Contains(element)) { if (newcomponents.TryGetValue(element.Category.Name, out List<Component> compList)) {
 compList.Add(component); newcomponents[element.Category.Name] = compList; } else { var l = new List<Component> { component }; newcomponents[element.Category.Name] = l; }
 }
 } } } } } itemnumber++; }
 return (newcomponents);
 }


4.1.1 creating single component:


 internal Component CreateComponent(Document doc, Category cat, ElementId elemId) { string error = String.Format("Some weird error happened! Can't create a component based on {0} category", cat.Name);
 Autodesk.Revit.DB.Options opt = new Autodesk.Revit.DB.Options(); Element element = doc.GetElement(elemId);  ElementId typeId = element.GetTypeId(); var family = doc.GetElement(typeId) as ElementType; var level = doc.GetElement(element.LevelId) as Level;

 var component = new Component { Type = cat.CategoryType.ToString(), Name = cat.Name, Category = GetTopCategory(cat).Name, Quantity = 1, Count = 1, Unit = Units.GetUnit(cat.Name),

 UniqueId = element.UniqueId,
  };
 if (family != null) {
 var nweight = family.get_Parameter(BuiltInParameter.STRUCTURAL_SECTION_COMMON_NOMINAL_WEIGHT);
 if (nweight != null) {  double nw = UnitUtils.ConvertFromInternalUnits(nweight.AsDouble(), UnitTypeId.PoundsForcePerFoot);
 component.NominalWeight = nw;
 Debug.WriteLine("NominalWeight " + nw); }
 var uniformat = family.get_Parameter(BuiltInParameter.UNIFORMAT_CODE);
 if (uniformat != null) { component.Uniformat = uniformat != null ? uniformat.AsString() : "";
 }
  }
 var listofMAterial = APIUtilities.GetAllMaterialFromElement(doc, element); var mainMaterial = APIUtilities.GetMaterialFromElement(doc, element); if (listofMAterial.Count > 0) { if (mainMaterial != null) { component.MaterialIds = listofMAterial.Select(m => m.UniqueId).ToList(); component.MaterialIds.Add(mainMaterial.UniqueId); component.MaterialNames = listofMAterial .Select(m => (m.MaterialCategory + " | " + m.MaterialClass + " | " + m.Name + " | " + mainMaterial.Name)).ToList(); } else { component.MaterialIds = listofMAterial.Select(m => m.UniqueId).ToList(); component.MaterialNames = listofMAterial .Select(m => (m.MaterialCategory + " | " + m.MaterialClass + " | " + m.Name)).ToList(); } }
 if (level != null && !string.IsNullOrEmpty(level.Name)) { component.LevelName = level.Name; } else { component.LevelName = ""; }
 if (typeId != null) { if (doc.GetElement(elemId).IsValidType(typeId)) { if (null != element.GetTypeId()) { component.Name = element.Name;
 if (family != null) { component.Type = family.FamilyName;
 if (component.NominalWeight == 0 && component.Category.Contains("Structural")) { var result = Regex.Match(component.Name, @"\d+$", RegexOptions.RightToLeft); if (result.Success) { component.NominalWeight = Math.Round(double.Parse(result.Value), 2); } // => 1234 } } } } }
 if (family != null) { // Update the dimenstion value from Element Type var widthParamList = family.GetParameters("Width"); var lengthParamList = family.GetParameters("Length"); var thicknessParamList = family.GetParameters("Thickness"); var heightParamList = family.GetParameters("Height"); this.UpdateComponentDimension(component, lengthParamList, widthParamList, thicknessParamList, heightParamList); }
 // Update the dimenstion value if the information is not present in Element Type var lengthList = doc.GetElement(elemId).GetParameters("Length"); var widthList = doc.GetElement(elemId).GetParameters("Width"); var depthList = doc.GetElement(elemId).GetParameters("Depth"); var unconnectedHeightList = doc.GetElement(elemId).GetParameters("Unconnected Height"); this.UpdateComponentDimension(component, lengthList, widthList, depthList, unconnectedHeightList);
 var areaList = doc.GetElement(elemId).GetParameters("Area");  if (areaList.Count > 0) { double area = 0; if (areaList[0] != null) { double areaFromRevit = areaList[0].AsDouble(); if (areaFromRevit > 0) { var displayUnitTypeId = areaList[0].GetUnitTypeId(); area = UnitUtils.Convert(areaFromRevit, displayUnitTypeId, UnitTypeId.SquareFeet); } }
 component.Area = Math.Round(area, 2); }
 var volumeList = doc.GetElement(elemId).GetParameters("Volume"); if (volumeList.Count > 0) { double volume = 0; if (volumeList[0] != null) { double volumeFromRevit = volumeList[0].AsDouble(); if (volumeFromRevit > 0) { var displayUnitTypeId = volumeList[0].GetUnitTypeId(); volume = UnitUtils.Convert(volumeFromRevit, displayUnitTypeId, UnitTypeId.CubicYards); } }
 component.Volume = Math.Round(volume, 2); }
 return component ?? throw new Exception(error); }

4.1.2 collecting component data:

 internal void UpdateComponentDimension(Component component, IList<Parameter> lengthList, IList<Parameter> widthList, IList<Parameter> depthList, IList<Parameter> heightParamList) { if (component.Length <= 0 && lengthList != null && lengthList.Count > 0) { double length = 0; if (lengthList[0] != null) { double lengthFromRevit = lengthList[0].AsDouble(); if (lengthFromRevit > 0) { var displayUnitTypeId = lengthList[0].GetUnitTypeId(); length = UnitUtils.Convert(lengthFromRevit, displayUnitTypeId, UnitTypeId.FeetFractionalInches); } }
 component.Length = Math.Round(length, 2); }
 if (component.Width <= 0 && widthList != null && widthList.Count > 0) { double width = 0; if (widthList[0] != null) { double widthFromRevit = widthList[0].AsDouble(); if (widthFromRevit > 0) { var displayUnitTypeId = widthList[0].GetUnitTypeId(); width = UnitUtils.Convert(widthFromRevit, displayUnitTypeId, UnitTypeId.FeetFractionalInches); } }
 component.Width = Math.Round(width, 2); }
 if (component.Depth <= 0 && depthList != null && depthList.Count > 0) { double depth = 0; if (depthList[0] != null) { double depthFromRevit = depthList[0].AsDouble(); if (depthFromRevit > 0) { var displayUnitTypeId = depthList[0].GetUnitTypeId(); depth = UnitUtils.Convert(depthFromRevit, displayUnitTypeId, UnitTypeId.FeetFractionalInches); } }
 component.Depth = Math.Round(depth, 2); }
 if (component.Depth <= 0 && heightParamList != null && heightParamList.Count > 0) { double height = 0; if (heightParamList[0] != null) { double heightFromRevit = heightParamList[0].AsDouble(); if (heightFromRevit > 0) { var displayUnitTypeId = heightParamList[0].GetUnitTypeId(); height = UnitUtils.Convert(heightFromRevit, displayUnitTypeId, UnitTypeId.FeetFractionalInches); } }
 component.Depth = Math.Round(height, 2); } }
4.1.2 collecting component data:
After making sure that we have our lowest common denominator - the component, on top of which, we will build everything else. Let's start creating our groups (see part one for the data structure explanation)
from here on out it keeps getting easier and simpler
4.2 Creating groups(Level2):
 internal List<Group> GenerateGroups(List<Component> listComponent) { string error = "No suitable group was found for this sub-project";
 Random rand = new Random(); int max = byte.MaxValue - 1; int min = 1; var groups = new Dictionary<string, Group>(); _ = new List<Group>();
 int r = rand.Next(min, max); int gr = rand.Next(min, max); int b = rand.Next(min, max);
 foreach (var comp in listComponent) {
 if (!string.IsNullOrEmpty(comp.Name)) {
 if (groups.TryGetValue(comp.Name, out Group tempGroup)) { comp.Color = tempGroup.Color; tempGroup.AddComponentToGroup(comp);
 groups[comp.Name] = tempGroup;
 } else {
 r = rand.Next(min, max); gr = rand.Next(min, max); b = rand.Next(min, max);
 System.Drawing.Color color = System.Drawing.Color.FromArgb(r, gr, b); comp.Color = color; var g = new Group { Name = comp.Name, Type = comp.Type, Color = color, Components = new ObservableCollection<Component>(new Component[] { comp }) };
 if (comp.MaterialNames != null) { g.MaterialNames = comp.MaterialNames.Aggregate("", (current, next) => current + " | " + next); } g.LevelNames = new ObservableCollection<string>(new string[] { comp.LevelName });
 groups[comp.Name] = g;
 } }
 } return groups.Values.ToList() ?? throw new Exception(error); }
internal List<Group> GenerateGroups(List<Component> listComponent){string error = "No suitable group was found for this sub-project";Random rand = new Random();int max = byte.MaxValue - 1;int min = 1;var groups = new Dictionary<string, Group>();_ = new List<Group>();int r = rand.Next(min, max);int gr = rand.Next(min, max);int b = rand.Next(min, max);foreach (var comp in listComponent){if (!string.IsNullOrEmpty(comp.Name)){if (groups.TryGetValue(comp.Name, out Group tempGroup)){comp.Color = tempGroup.Color;tempGroup.AddComponentToGroup(comp);groups[comp.Name] = tempGroup;}else{r = rand.Next(min, max);gr = rand.Next(min, max);b = rand.Next(min, max);System.Drawing.Color color = System.Drawing.Color.FromArgb(r, gr, b);comp.Color = color;var g = new Group{Name = comp.Name,Type = comp.Type,Color = color,Components = new ObservableCollection<Component>(new Component[] { comp })};if (comp.MaterialNames != null){g.MaterialNames = comp.MaterialNames.Aggregate("", (current, next) => current + " | " + next);}g.LevelNames = new ObservableCollection<string>(new string[] { comp.LevelName });groups[comp.Name] = g;}}}return groups.Values.ToList() ?? throw new Exception(error);}
Creating the groups is definitely easier than the component part.
the one takeaway, is that we are segregating these groups based on the component name and we are giving them unique color codes.
Next we need to create our subprojects.
internal List<SubProject> GenerateSubProjects(Dictionary<string, List<Component>> GeneratedComponents){Debug.WriteLine("List of components sent to GenerateSubProjects() = " + GeneratedComponents.Count.ToString());string error = "Can't create sub projects, no suitable category found!";var subProjects = new List<SubProject>();foreach (var compList in GeneratedComponents){var subProject = CreateSubProject(compList.Key, compList.Value);subProjects.Add(subProject);}return subProjects.Count > 0 ? subProjects : throw new Exception(error);} 4.3.1 creating single subproject:internal SubProject CreateSubProject(string highCategory, List<Component> listComponent){string error = String.Format("Can't create a Sub-Project based on {0} category, it is not a valid category! ", highCategory);var subproject = new SubProject();if (highCategory == null)subproject = null;else{var groups = GenerateGroups(listComponent);subproject = new SubProject{Category = highCategory,Groups = new ObservableCollection<Group>(groups),};}return subproject ?? throw new Exception(error);}
We're almost done, one one final level remain and that's the Project level
4.4 Creating a Project(Level4):
The simplest of them all you only need one line of code:
return new Project(index = 0, title, subprojects: GenerateSubProjects(loadedComponents));
Finally, we're done with the data structure, next we need to setup our rendering logic
return new Project(index = 0, title, subprojects: GenerateSubProjects(loadedComponents));
5. Rendering our plans and elevations:
We have our plans that we collected in part 1, now is the time to use them and make sure that we render our data in correctly in each view.
We need to loop through our view list and export each view information to an image or a pdf document that collects all the images and text.
We also need to keep in our mind that Revit has many types of views (Sections, Elevations and FloorPlans). We have the options to filter our list of views by type or ignore the type and export everything. Also elevations are subtype of sections, if we want to filter them out we might need to do some gymnastics but its not impossible.
For now i'll comment the filtering part.
this is how we will loop over each view
var possibleViews = originalViews.Select(v => v as View).ToList();

var viewsElevations = originalElevations.Select(e => e as View).ToList();
possibleViews.InsertRange(0, viewsElevations);
Debug.WriteLine("possibleViews " + possibleViews.Count);

#region //multiple views region

int totalItems = totalGroups * possibleViews.Count();
int itemsDone = 0;
foreach (var view in possibleViews) // .Where(v => v.ViewType == ViewType.FloorPlan) || .Where(v => v.ViewType == ViewType.Elevation)
{

ExportView(view, doc, project, allElements, uILayout, finalImageSize, bigText, smallText);

}
Now it's time to dive into the ExportView method, which is complicated enough to have its own article.
2.
ExportView(view, doc, project, allElements, uILayout, finalImageSize, bigText, smallText);
Considering the above params, we are ready to start exporting each view we loop through
5. Rendering our plans and elevations in passive modes (background):
Essentially we are creating backgrounds to use them as a base when we overlay our dynamically generated foregrounds.
The way we do this is by changing the view type to temporary view:
 public static void TemporaryViewEnabled(Document doc, View view, bool enabled) {
 ElementId vID = view.Id; if (enabled) { view.EnableTemporaryViewPropertiesMode(vID); return;
 }  TemporaryViewMode TVM = TemporaryViewMode.TemporaryViewProperties; if (view.IsTemporaryViewPropertiesModeEnabled()) doc.ActiveView.DisableTemporaryViewMode(TVM);

 }
Setting the styles to halfTone:
 public static void SetHalfToneForView(Document doc, View view, Project project, bool halfTone) {   foreach (var subProject in project.SubProjects) { foreach (var group in subProject.Groups) { foreach (var comp in group.Components) { Element elem = doc.GetElement(comp.UniqueId); OverrideGraphicSettings ogsElement = view.GetElementOverrides(elem.Id);
 if (ogsElement.IsValidObject) { ogsElement.SetHalftone(halfTone); view.SetElementOverrides(elem.Id, ogsElement); }
 } } }
 }
and rendering the view to a bmp file :
 public static string ExportViewToImage(Document doc, string path, View view, ImageResolution imageRes, ImageFileType imagetype, int zoomLevel = 50) { IList<ElementId> views = new List<ElementId>();
 try { if (view != null) views.Add(view.Id);
 } catch (Exception e) {  Debug.WriteLine(" error exporting image {0}", e.Message); }
 var ieo = new ImageExportOptions { FilePath = path, HLRandWFViewsFileType = imagetype, ImageResolution = imageRes, ZoomType = ZoomFitType.Zoom, ShouldCreateWebSite = false, ViewName = "quantify 2D", Zoom = zoomLevel, ShadowViewsFileType = imagetype, }; if (views.Count > 0) { ieo.SetViewsAndSheets(views); ieo.ExportRange = ExportRange.SetOfViews; } else { ieo.ExportRange = ExportRange .CurrentView; }
  var viewName = "- 2D View 1"; var dash = " - "; var extpicture = ".png"; var extwebpage = ".html"; string viewtype = Regex.Replace(view.ViewType.ToString(), "[A-Z]", " $0").Trim(); var finalPath = path + dash + viewtype + dash + view.Name + extpicture; if (!File.Exists(finalPath)) { if (ImageExportOptions.IsValidFileName(path)) { try { doc.ExportImage(ieo); } catch { if (!File.Exists(finalPath)) return string.Empty; } } else { Debug.WriteLine(" not ValidFileName {0}", path); return string.Empty; } }
 return finalPath;
 }
After acquiring our background, we need to calculate our metrics, surfaces, volumes and counts
5.1 Calculating our quantities based on the elements we collected:
To collect the data correctly we need to do some cleaning and put some guardrails in place, which will be overlayed on top of the base we rendered earlier.
And the way we will approach this is by calculating the metrics on the group level, but before we do that we need to extract the possible groups per view
List<Group> possibleGroups; if (level == null) { possibleGroups = sub.Groups.Where(g => g.Components.Where(c => IsElementVisibleInView(view, doc.GetElement(c.UniqueId)) || !IsElementOutsideCropBox(doc.GetElement(c.UniqueId), view)).Count() > 0).ToList();
} else { possibleGroups = sub.Groups.Where(g => g.LevelNames.Contains(level.Name) && g.Components.Where(c => IsElementVisibleInView(view, doc.GetElement(c.UniqueId)) || !IsElementOutsideCropBox(doc.GetElement(c.UniqueId), view)).Count() > 0).ToList(); }
Now that we have the possible groups lets loop through each group and calculate our metrics
 foreach (var group in possibleGroups) { var itemstodo = group.Components.Where(c => IsElementVisibleInView(view, doc.GetElement(c.UniqueId)) || !IsElementOutsideCropBox(doc.GetElement(c.UniqueId), view)).ToList();
 if (level != null || view.ViewType == ViewType.Elevation) { if (itemstodo.Count > 0) //&& representedGroups.Contains(group) {
 System.Drawing.Color cl = System.Drawing.Color.FromArgb(128, group.Color); Brush brush = new SolidBrush(cl); var lenght = Math.Round(itemstodo.Select(a => a.Length).Sum()).ToString(); var area = Math.Round(itemstodo.Select(a => a.Area).Sum()).ToString(); var volume = Math.Round(itemstodo.Select(a => a.Volume).Sum()).ToString(); var count = itemstodo.Count().ToString(); string mat = ""; if (group.MaterialNames != null) { mat = group.MaterialNames; }
 var material = mat;   } }
 }
5.2 Enabling Temp View and updating the Revit elements:
We successfully collected the data, now we need to update the revit elements accordingly and make sure that our view is ready for the second rendering phase, but first and always enabling temp view so we can revert our changes:
TemporaryViewEnabled(doc, view, true) (see implementation above)
then changing our elements according to our groups data:
 foreach (var group in possibleGroups) {
 FilteredElementCollector collector = new FilteredElementCollector(doc); ICollection<Element> collection = collector.OfClass(typeof(FillPatternElement)).ToElements(); string UniquefillPatternId = null; string UniquefillPatternIdDrafting = null; Element patModelElem = null; Element patDraftElem = null;

 FillPatternTarget fpTarget = FillPatternTarget.None; foreach (var fillPatern in collection) {  var fp = fillPatern as FillPatternElement; if (fp != null) {  fpTarget = fp.GetFillPattern().Target; var fpReal = fp.GetFillPattern();
 if (fpReal.IsSolidFill) {  UniquefillPatternId = fillPatern.UniqueId; patModelElem = doc.GetElement(UniquefillPatternId);  }
 if (fpTarget == FillPatternTarget.Drafting) { // Debug.WriteLine("fpTarget == FillPatternTarget.Drafting :" + fpTarget.ToString()); if (fpReal.IsSolidFill) {  UniquefillPatternIdDrafting = fillPatern.UniqueId; patDraftElem = doc.GetElement(UniquefillPatternIdDrafting);  } } } }
 OverrideGraphicSettings ogsCategory = null; OverrideGraphicSettings ogsElement = null; Element elem = null; foreach (var comp in group.Components) {  elem = doc.GetElement(comp.UniqueId); ogsElement = view.GetElementOverrides(elem.Id);
 if (ogsElement.IsValidObject) {  Autodesk.Revit.DB.Color cl = new Autodesk.Revit.DB.Color(color.R, color.G, color.B); try { try {
 ogsElement.SetCutLineWeight(lineWeight); ogsElement.SetProjectionLineWeight(lineWeight); ogsElement.SetCutBackgroundPatternColor(cl);  ogsElement.SetCutForegroundPatternColor(cl);  ogsElement.SetCutLineColor(cl);  ogsElement.SetProjectionLineColor(cl);  ogsElement.SetSurfaceBackgroundPatternColor(cl);
 ogsElement.SetSurfaceBackgroundPatternVisible(true); ogsElement.SetSurfaceForegroundPatternColor(cl);  } catch (Exception e) { Logger.Instance.Info("Error while setting pattern style.", e); Debug.WriteLine("ogsElement Error setting style {0}", e.Message); }
 if (fpTarget == FillPatternTarget.Drafting) { try {
 ogsElement.SetSurfaceBackgroundPatternId(patDraftElem.Id); ogsElement.SetSurfaceForegroundPatternId(patDraftElem.Id); ogsElement.SetCutForegroundPatternId(patDraftElem.Id);  ogsElement.SetCutBackgroundPatternId(patDraftElem.Id); } catch (Exception e) {  Debug.WriteLine("ogsElement FillPatternTarget.Drafting Error setting style {0}", e.Message); }
 } else { try {
 ogsElement.SetSurfaceBackgroundPatternId(patModelElem.Id); ogsElement.SetSurfaceForegroundPatternId(patModelElem.Id); ogsElement.SetCutForegroundPatternId(patModelElem.Id);  ogsElement.SetCutBackgroundPatternId(patModelElem.Id); } catch (Exception e) {
  Debug.WriteLine("ogsElement FillPatternTarget.Different Error setting style {0}", e.Message);
 }
 } try {
 view.SetElementOverrides(elem.Id, ogsElement);
 } catch (Exception e) {  Debug.WriteLine("{0} view.SetElementOverrides(elem.Id, ogsElement) Error setting style {1}", elem.Name, e.Message); }
 } catch (Exception e) {  Debug.WriteLine("Error setting style {0}", e.Message); }   }
 } }
 }
5.3 Rendering the color coding and the quantities description:
Now that we have updated our revit elements, we need to render them on a bitmap for that we need to use
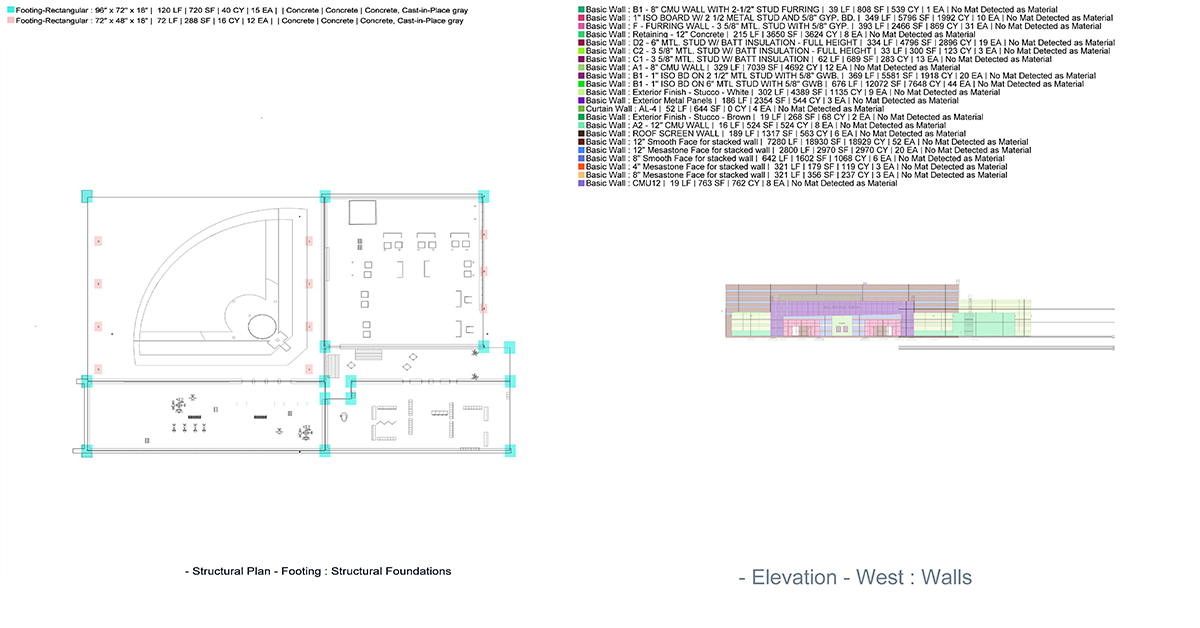
 // Debug.WriteLine("FillRectangleCore " + group.Color.Name); uILayout.FillRectangleCore(bitmap, brush, xPos, yPos, recSize); // Debug.WriteLine("DrawTextSystemDrawing " + group.Color.Name); uILayout.DrawTextSystemDrawing(group.Type + " : " + group.Name + " | " + " " + lenght + " LF" + " | " + area + " SF" + " | " + volume + " CY" + " | " + count + " EA" + " | " + material + "" , bitmap, new CoreRectangle(xPos + xPos, yPos, (int)recSize.X * (distancePrecentage),
 (int)(recSize.Y + recSize.Y + (int)(recSize.Y / 3))),
 smallText - (int)(smallText / 6), System.Drawing.Brushes.Black);
 uILayout.DrawTextSystemDrawing(Path.GetFileNameWithoutExtension(halfTonePath) + " : " + sub.Category , bitmap, new CoreRectangle(bitmap.Width / 4, bitmap.Height * 90 / 100,
 bitmap.Width - (bitmap.Width / 4), bitmap.Height),
 bigText / 2, System.Drawing.Brushes.SlateGray); yPos += (int)(recSize.Y + (int)(recSize.Y / 1.5f)); }
To make this super easy we need to have a class that will take care of the UI layout and the rendering like the following:
 public class UILayout {

 public void FillRectangleCore(Bitmap bitmap, System.Drawing.Brush brush, int xpos, int ypos, Vector2 size) {
 var graphics = Graphics.FromImage(bitmap);
 graphics.InterpolationMode = InterpolationMode.Low; graphics.SmoothingMode = SmoothingMode.None; graphics.FillRectangle(brush, new CoreRectangle(xpos, ypos, (int)size.X, (int)size.Y)); graphics.Save(); // return bitmap; }

 public void DrawTextSystemDrawing(string textToDraw, Stream stream, CoreRectangle coreRectangle) {
 stream.Position = stream.Read(APIUtilities.StreamToByte(stream), 0, (int)stream.Length) + 1; stream.Seek(stream.Position, SeekOrigin.Begin); var imageLegend = new Bitmap(stream); using (var graphics = Graphics.FromImage(imageLegend)) { graphics.InterpolationMode = InterpolationMode.Default; graphics.SmoothingMode = SmoothingMode.AntiAlias; graphics.CompositingMode = CompositingMode.SourceOver; using (var font = new Font("Arial", 60, GraphicsUnit.Point)) { graphics.DrawString(textToDraw, font, System.Drawing.Brushes.Black, coreRectangle); }
 }   }

}
The only remaining thing now is to overlay everything
5.4 Overlay the renderings using UILayout new method :
We will add one method to our UIlayout class that will help with the overlay
 public void OverlayImage1OnImage2Arithmetic(string image2PAth, SysImage image1) { Bitmap resultBitmap = new Bitmap(image1.Width, image1.Height, image1.PixelFormat); using (Bitmap imageMain = new Bitmap(image2PAth)) { using (image1) {
   using (Graphics g = Graphics.FromImage(resultBitmap)) { //set background color  g.InterpolationMode = InterpolationMode.Default; g.SmoothingMode = SmoothingMode.AntiAlias; g.CompositingMode = CompositingMode.SourceOver;
 g.Clear(System.Drawing.Color.FromArgb(0, 255, 255, 255)); g.Flush(); g.Save();
 }  resultBitmap = ExtBitmap.ArithmeticBlend((Bitmap)imageMain, (Bitmap)image1, ColorCalculator.ColorCalculationType.Add);

 }  } SaveBitmap(resultBitmap, image2PAth, false);
 }


 public static void SaveBitmap(Bitmap bitmap, string path) { Image image = new Bitmap(ImageToStream(bitmap));
 using (image) { bitmap.Dispose(); image.Save(path); image.Dispose(); } }
5.5 Voila Done :
I hope this was helpful to you, please if you have questions, and ask all your questions on the forum.Cheers,
![Support]()
Support
var possibleViews = originalViews.Select(v => v as View).ToList();
var viewsElevations = originalElevations.Select(e => e as View).ToList();
possibleViews.InsertRange(0, viewsElevations);
Debug.WriteLine("possibleViews " + possibleViews.Count);
#region //multiple views region
int totalItems = totalGroups * possibleViews.Count();
int itemsDone = 0;
foreach (var view in possibleViews) // .Where(v => v.ViewType == ViewType.FloorPlan) || .Where(v => v.ViewType == ViewType.Elevation)
{
ExportView(view, doc, project, allElements, uILayout, finalImageSize, bigText, smallText);
}
Now it's time to dive into the ExportView method, which is complicated enough to have its own article.
2.
ExportView(view, doc, project, allElements, uILayout, finalImageSize, bigText, smallText);
Considering the above params, we are ready to start exporting each view we loop through
5. Rendering our plans and elevations in passive modes (background):
Essentially we are creating backgrounds to use them as a base when we overlay our dynamically generated foregrounds.
The way we do this is by changing the view type to temporary view:
public static void TemporaryViewEnabled(Document doc, View view, bool enabled) {
ElementId vID = view.Id; if (enabled) { view.EnableTemporaryViewPropertiesMode(vID); return;
} TemporaryViewMode TVM = TemporaryViewMode.TemporaryViewProperties; if (view.IsTemporaryViewPropertiesModeEnabled()) doc.ActiveView.DisableTemporaryViewMode(TVM);
}
Setting the styles to halfTone:
public static void SetHalfToneForView(Document doc, View view, Project project, bool halfTone) { foreach (var subProject in project.SubProjects) { foreach (var group in subProject.Groups) { foreach (var comp in group.Components) { Element elem = doc.GetElement(comp.UniqueId); OverrideGraphicSettings ogsElement = view.GetElementOverrides(elem.Id);
if (ogsElement.IsValidObject) { ogsElement.SetHalftone(halfTone); view.SetElementOverrides(elem.Id, ogsElement); }
} } }
}
and rendering the view to a bmp file :
public static string ExportViewToImage(Document doc, string path, View view, ImageResolution imageRes, ImageFileType imagetype, int zoomLevel = 50) { IList<ElementId> views = new List<ElementId>();
try { if (view != null) views.Add(view.Id);
} catch (Exception e) { Debug.WriteLine(" error exporting image {0}", e.Message); }
var ieo = new ImageExportOptions { FilePath = path, HLRandWFViewsFileType = imagetype, ImageResolution = imageRes, ZoomType = ZoomFitType.Zoom, ShouldCreateWebSite = false, ViewName = "quantify 2D", Zoom = zoomLevel, ShadowViewsFileType = imagetype, }; if (views.Count > 0) { ieo.SetViewsAndSheets(views); ieo.ExportRange = ExportRange.SetOfViews; } else { ieo.ExportRange = ExportRange .CurrentView; }
var viewName = "- 2D View 1"; var dash = " - "; var extpicture = ".png"; var extwebpage = ".html"; string viewtype = Regex.Replace(view.ViewType.ToString(), "[A-Z]", " $0").Trim(); var finalPath = path + dash + viewtype + dash + view.Name + extpicture; if (!File.Exists(finalPath)) { if (ImageExportOptions.IsValidFileName(path)) { try { doc.ExportImage(ieo); } catch { if (!File.Exists(finalPath)) return string.Empty; } } else { Debug.WriteLine(" not ValidFileName {0}", path); return string.Empty; } }
return finalPath;
}
return;
After acquiring our background, we need to calculate our metrics, surfaces, volumes and counts
5.1 Calculating our quantities based on the elements we collected:
To collect the data correctly we need to do some cleaning and put some guardrails in place, which will be overlayed on top of the base we rendered earlier.
And the way we will approach this is by calculating the metrics on the group level, but before we do that we need to extract the possible groups per view
List<Group> possibleGroups;if (level == null){possibleGroups = sub.Groups.Where(g =>g.Components.Where(c => IsElementVisibleInView(view, doc.GetElement(c.UniqueId)) ||!IsElementOutsideCropBox(doc.GetElement(c.UniqueId), view)).Count() > 0).ToList();
}else{possibleGroups = sub.Groups.Where(g => g.LevelNames.Contains(level.Name) &&g.Components.Where(c => IsElementVisibleInView(view, doc.GetElement(c.UniqueId)) || !IsElementOutsideCropBox(doc.GetElement(c.UniqueId), view)).Count() > 0).ToList();}
Now that we have the possible groups lets loop through each group and calculate our metrics
foreach (var group in possibleGroups){var itemstodo = group.Components.Where(c => IsElementVisibleInView(view, doc.GetElement(c.UniqueId)) || !IsElementOutsideCropBox(doc.GetElement(c.UniqueId), view)).ToList();if (level != null || view.ViewType == ViewType.Elevation){if (itemstodo.Count > 0) //&& representedGroups.Contains(group){System.Drawing.Color cl = System.Drawing.Color.FromArgb(128, group.Color);Brush brush = new SolidBrush(cl);var lenght = Math.Round(itemstodo.Select(a => a.Length).Sum()).ToString();var area = Math.Round(itemstodo.Select(a => a.Area).Sum()).ToString();var volume = Math.Round(itemstodo.Select(a => a.Volume).Sum()).ToString();var count = itemstodo.Count().ToString();string mat = "";if (group.MaterialNames != null){mat = group.MaterialNames;}var material = mat;}}}
5.2 Enabling Temp View and updating the Revit elements:
We successfully collected the data, now we need to update the revit elements accordingly and make sure that our view is ready for the second rendering phase, but first and always enabling temp view so we can revert our changes:
TemporaryViewEnabled(doc, view, true) (see implementation above)
then changing our elements according to our groups data:
foreach (var group in possibleGroups) {
FilteredElementCollector collector = new FilteredElementCollector(doc); ICollection<Element> collection = collector.OfClass(typeof(FillPatternElement)).ToElements(); string UniquefillPatternId = null; string UniquefillPatternIdDrafting = null; Element patModelElem = null; Element patDraftElem = null;
FillPatternTarget fpTarget = FillPatternTarget.None; foreach (var fillPatern in collection) { var fp = fillPatern as FillPatternElement; if (fp != null) { fpTarget = fp.GetFillPattern().Target; var fpReal = fp.GetFillPattern();
if (fpReal.IsSolidFill) { UniquefillPatternId = fillPatern.UniqueId; patModelElem = doc.GetElement(UniquefillPatternId); }
if (fpTarget == FillPatternTarget.Drafting) { // Debug.WriteLine("fpTarget == FillPatternTarget.Drafting :" + fpTarget.ToString()); if (fpReal.IsSolidFill) { UniquefillPatternIdDrafting = fillPatern.UniqueId; patDraftElem = doc.GetElement(UniquefillPatternIdDrafting); } } } }
OverrideGraphicSettings ogsCategory = null; OverrideGraphicSettings ogsElement = null; Element elem = null; foreach (var comp in group.Components) { elem = doc.GetElement(comp.UniqueId); ogsElement = view.GetElementOverrides(elem.Id);
if (ogsElement.IsValidObject) { Autodesk.Revit.DB.Color cl = new Autodesk.Revit.DB.Color(color.R, color.G, color.B); try { try {
ogsElement.SetCutLineWeight(lineWeight); ogsElement.SetProjectionLineWeight(lineWeight); ogsElement.SetCutBackgroundPatternColor(cl); ogsElement.SetCutForegroundPatternColor(cl); ogsElement.SetCutLineColor(cl); ogsElement.SetProjectionLineColor(cl); ogsElement.SetSurfaceBackgroundPatternColor(cl);
ogsElement.SetSurfaceBackgroundPatternVisible(true); ogsElement.SetSurfaceForegroundPatternColor(cl); } catch (Exception e) { Logger.Instance.Info("Error while setting pattern style.", e); Debug.WriteLine("ogsElement Error setting style {0}", e.Message); }
if (fpTarget == FillPatternTarget.Drafting) { try {
ogsElement.SetSurfaceBackgroundPatternId(patDraftElem.Id); ogsElement.SetSurfaceForegroundPatternId(patDraftElem.Id); ogsElement.SetCutForegroundPatternId(patDraftElem.Id); ogsElement.SetCutBackgroundPatternId(patDraftElem.Id); } catch (Exception e) { Debug.WriteLine("ogsElement FillPatternTarget.Drafting Error setting style {0}", e.Message); }
} else { try {
ogsElement.SetSurfaceBackgroundPatternId(patModelElem.Id); ogsElement.SetSurfaceForegroundPatternId(patModelElem.Id); ogsElement.SetCutForegroundPatternId(patModelElem.Id); ogsElement.SetCutBackgroundPatternId(patModelElem.Id); } catch (Exception e) {
Debug.WriteLine("ogsElement FillPatternTarget.Different Error setting style {0}", e.Message);
}
} try {
view.SetElementOverrides(elem.Id, ogsElement);
} catch (Exception e) { Debug.WriteLine("{0} view.SetElementOverrides(elem.Id, ogsElement) Error setting style {1}", elem.Name, e.Message); }
} catch (Exception e) { Debug.WriteLine("Error setting style {0}", e.Message); } }
} }
}
5.3 Rendering the color coding and the quantities description:
Now that we have updated our revit elements, we need to render them on a bitmap for that we need to use
// Debug.WriteLine("FillRectangleCore " + group.Color.Name); uILayout.FillRectangleCore(bitmap, brush, xPos, yPos, recSize); // Debug.WriteLine("DrawTextSystemDrawing " + group.Color.Name); uILayout.DrawTextSystemDrawing(group.Type + " : " + group.Name + " | " + " " + lenght + " LF" + " | " + area + " SF" + " | " + volume + " CY" + " | " + count + " EA" + " | " + material + "" , bitmap, new CoreRectangle(xPos + xPos, yPos, (int)recSize.X * (distancePrecentage),
(int)(recSize.Y + recSize.Y + (int)(recSize.Y / 3))),
smallText - (int)(smallText / 6), System.Drawing.Brushes.Black);
uILayout.DrawTextSystemDrawing(Path.GetFileNameWithoutExtension(halfTonePath) + " : " + sub.Category , bitmap, new CoreRectangle(bitmap.Width / 4, bitmap.Height * 90 / 100,
bitmap.Width - (bitmap.Width / 4), bitmap.Height),
bigText / 2, System.Drawing.Brushes.SlateGray);
yPos += (int)(recSize.Y + (int)(recSize.Y / 1.5f)); }
To make this super easy we need to have a class that will take care of the UI layout and the rendering like the following:
public class UILayout {
public void FillRectangleCore(Bitmap bitmap, System.Drawing.Brush brush, int xpos, int ypos, Vector2 size) {
var graphics = Graphics.FromImage(bitmap);
graphics.InterpolationMode = InterpolationMode.Low; graphics.SmoothingMode = SmoothingMode.None; graphics.FillRectangle(brush, new CoreRectangle(xpos, ypos, (int)size.X, (int)size.Y)); graphics.Save(); // return bitmap; }
public void DrawTextSystemDrawing(string textToDraw, Stream stream, CoreRectangle coreRectangle) {
stream.Position = stream.Read(APIUtilities.StreamToByte(stream), 0, (int)stream.Length) + 1; stream.Seek(stream.Position, SeekOrigin.Begin); var imageLegend = new Bitmap(stream); using (var graphics = Graphics.FromImage(imageLegend)) { graphics.InterpolationMode = InterpolationMode.Default; graphics.SmoothingMode = SmoothingMode.AntiAlias; graphics.CompositingMode = CompositingMode.SourceOver; using (var font = new Font("Arial", 60, GraphicsUnit.Point)) { graphics.DrawString(textToDraw, font, System.Drawing.Brushes.Black, coreRectangle); }
} }
}
The only remaining thing now is to overlay everything
bigText / 2, System.Drawing.Brushes.SlateGray);